Diver safety
Spearfishing Safety
Spearfishing is a sport that I am extremely passionate about, but it's also a sport where things can go wrong very quickly, especially when you start diving deeper and doing many repetitive dives.
Through many years of diving I picked up a lot of useful safety info.
I felt that some of this information should be shared with our divers.
This is not intended to be a complete spearfishing safety manual. There are many other risks involved. These are simply some of the important things I have learned through my experience, NAUI training, freediving and being involved in spearfishing over many years.
Nothing replaces common sense, diving within your limits and, very importantly, diving with a buddy who keeps an eye on you.
It is the responsibility of all participants to make our sport as safe as possible.
Dive Float
I was diving beyond the kelp at Melkbosstrand with a buddy without dive floats when about 20 rubber ducks in a race from Big Bay were racing down on us. We looked at each other and realised all we could do was wait until the last seconds, dive down and stay there as long as we could. We could see the rubber ducks flying overhead and the sound could have taken your breath away, but we relaxed and waited. When we surfaced, they had all luckily passed.
The question afterwards was: who was at fault?
The reality is that it does not really matter who was at fault if somebody gets killed.
The answer is simple.
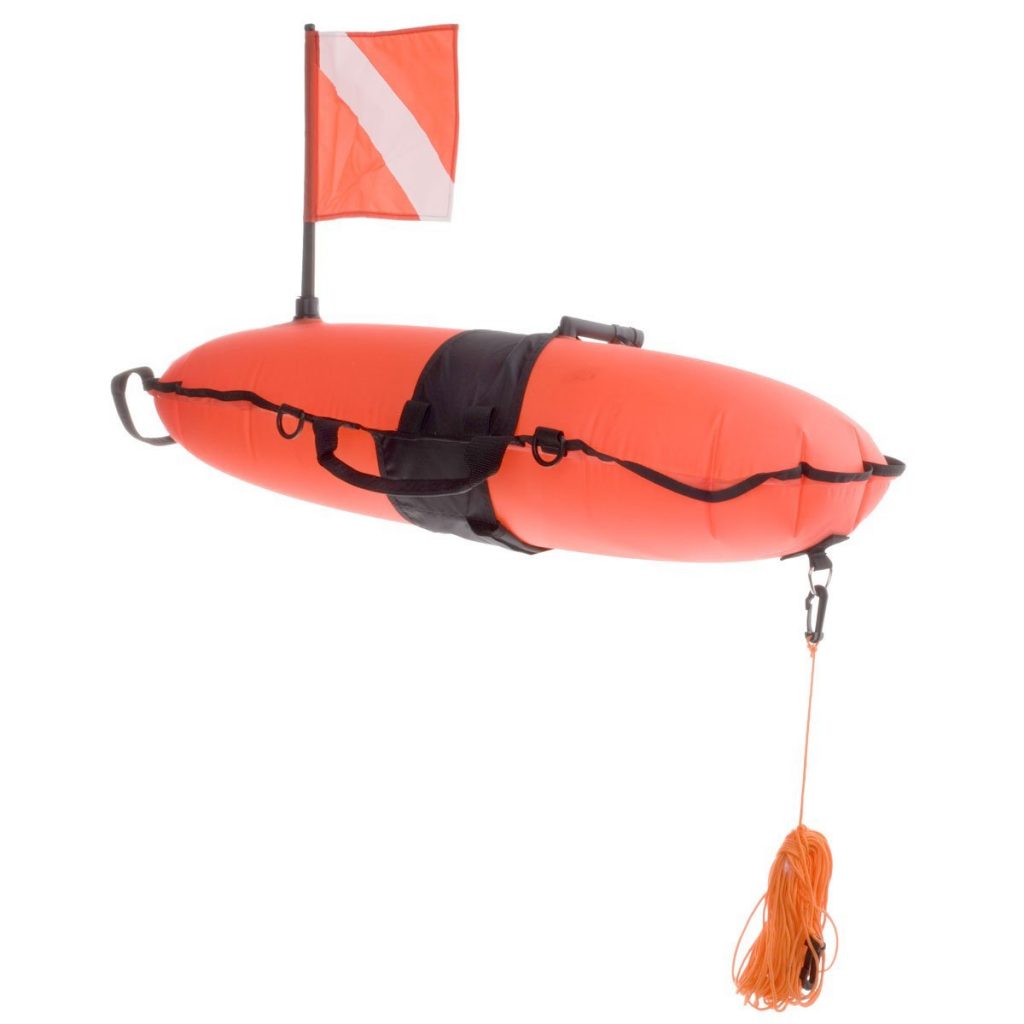
Use a dive float and even better if it has a dive flag.
A boat skipper needs to know that there are divers in the water. Without a dive float, there is often absolutely no way for a skipper to know that somebody is about to surface in front of the boat.
We expect boats to keep clear of us, but we also have a responsibility to make ourselves visible.
A dive float with a dive flag is one of the simplest pieces of safety equipment we have. Use it.
Weighting
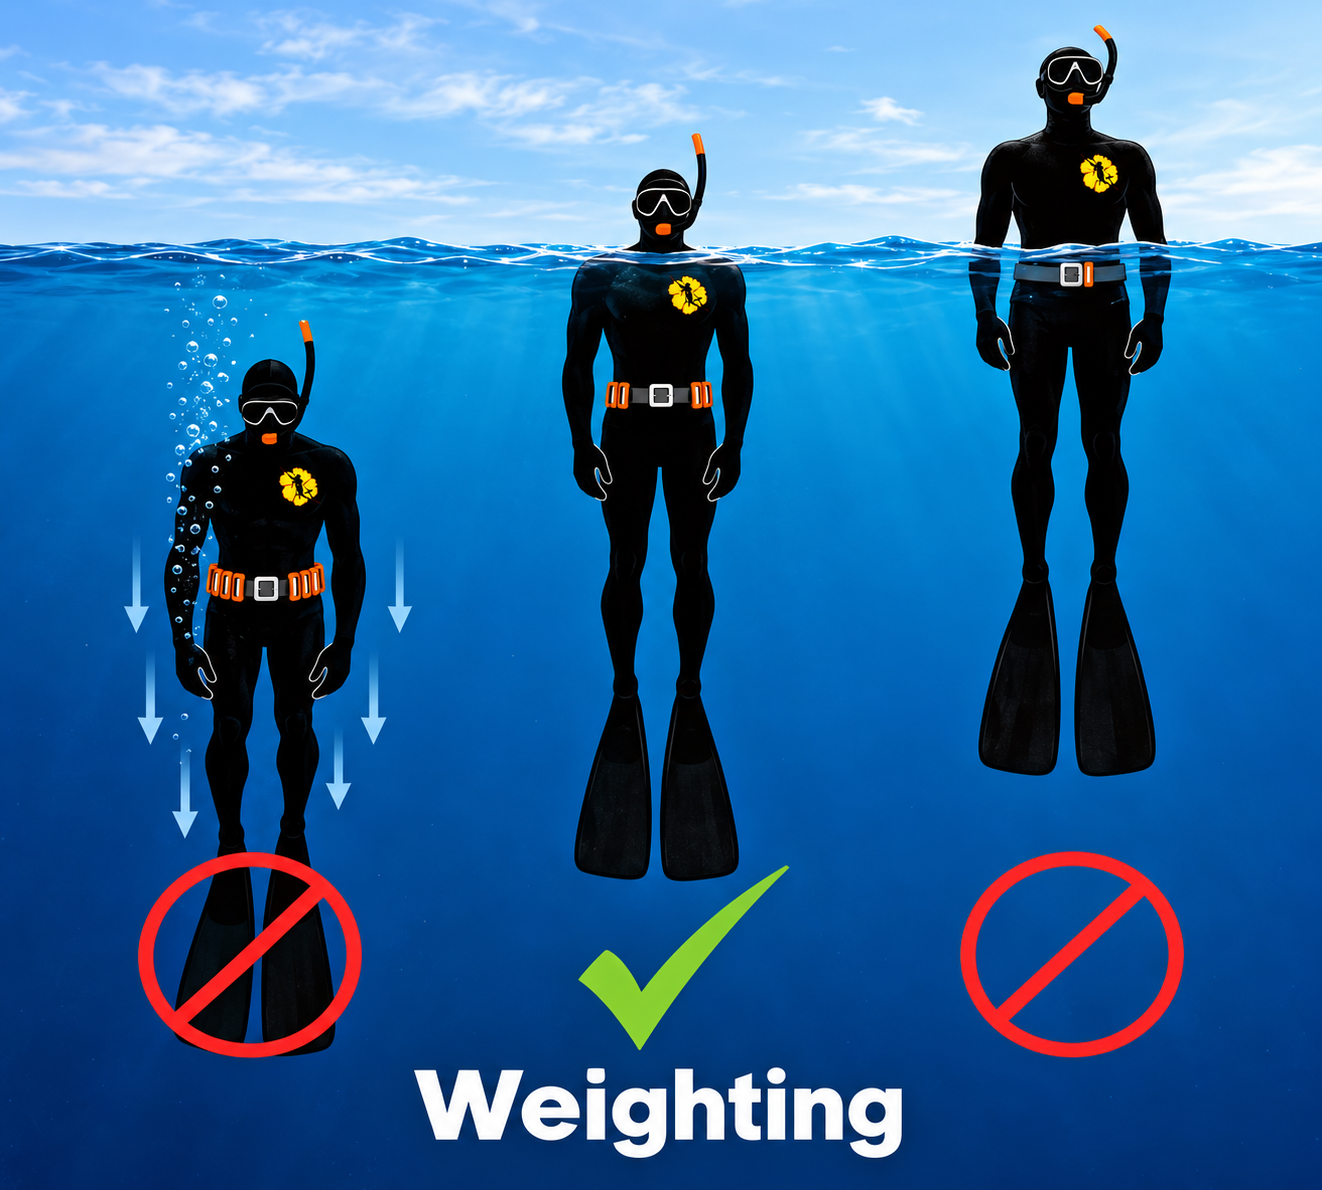
There is no single correct amount of weight for every dive.
Your weighting depends on the depth you are diving, the conditions and what type of hunting you are doing.
If you are working very shallow water and trying to lie flat amongst rocks or kelp, a little more weight can make things easier.
But when you start diving deeper, being overweight becomes harder and more dangerous.
Remember, every kilogram you put on your belt still has to come back up to the surface with you.
For deeper dives you should normally set your neutral buoyancy at no shallower than about 10 metres. This means that once you come above that point you become positively buoyant and the last part of the ascent gets easier. For considerably deeper dives your neutral buoyancy can be set deeper.
Never weight yourself for the descent and then forget about the ascent.
The ascent is where you are most vulnerable.
It is better to work a little harder on the descent and come back up comfortably than to descend easily and struggle to reach the surface.
Check your buoyancy at the surface
After a passive, relaxed exhalation, you should still float comfortably at the surface without kicking or moving your arms.
With a trained buddy supervising in calm water, use this surface check to help refine your weighting:
- Float upright and take a comfortable full breath, without forcing or packing extra air. The water may sit around neck level.
- Return to normal breathing, then take a relaxed full breath. Without kicking or sculling, check that you remain afloat; the water may sit near your chin.
- Exhale passively. You should remain at the surface rather than sink. Neck and chin levels are only rough guides, not targets for adding weight.
- If necessary, adjust the belt in small increments and repeat the check with your buddy. Remove weight if you sink. Recheck whenever your equipment or water conditions change.
Positive buoyancy matters most near the surface. Blackout can occur during the final metres of ascent or after surfacing. Set your weighting with a qualified freediving instructor so buoyancy assists this part of your ascent; a surface check alone does not confirm your buoyancy at depth.
Appropriate weighting can reduce unnecessary effort and make diving more comfortable, but it cannot guarantee safety or prevent blackout. Always dive with a trained, attentive buddy.
Breathe-Up and Decompression Sickness
Your surface recovery and breathe-up are probably amongst the most important parts of your dive.
One of the biggest mistakes spearfishermen make is rushing their surface interval because they want to get back down to the fish.
The fish can wait. There is nothing to gain from rushing.
For repetitive diving, the following are PFI surface interval recommendations. These are minimum recommendations and conservative diving is always advised.
For dives less than 25m
1. Observe a surface interval (SI) of twice the length of the dive. For example, a 1:30 dive gets a 3:00 SI.
2. Every 1.5 hours, observe a 15-minute SI.
For dives 30m (divide depth by 5 = amount of time to rest)
1. Observe a minimum of an 6-minute SI.
2. Every 1.5 hours, observe a 15-minute SI.
For dives 40m
1. Observe a minimum of a 8-minute SI.
2. No more than 6 target dives per day.
For dives 50m
1. Observe a minimum of a 10-minute SI.
2. No more than 6 target dives per day.
Flying after 1 dive have a surface interval of 12 hours before flying and after repetitive days of diving 24hours SIT.
Breathing before a dive should be calm and relaxed. Divers should avoid rapid breathing or any attempt to artificially extend breath-hold time through hyperventilation. A relaxed breathing pattern followed by a single full inhalation before submerging is generally the safest approach.
Hyperventilation.
Hyperventilation simply means breathing faster or deeper than your body actually needs.
It might make you feel as though you are better prepared for the dive, but you are not putting significantly more oxygen into your body. What you are mainly doing is reducing the carbon dioxide level in your bloodstream.
That is dangerous because carbon dioxide is one of the main things that creates your urge to breathe.
By artificially lowering your CO2 level, you delay that warning.
Keep your breathe-up relaxed and breathe normally.
Do not deliberately breathe deeper, faster or force your exhale. The purpose of the breathe-up is relaxation, not trying to load yourself with more oxygen.
Also be careful in rough water.
When there is chop and you are constantly clearing your snorkel, breathing hard and fighting the sea, you can start hyperventilating without even realising it.
Equalising
As we descend, pressure increases.
The air spaces in our lungs, sinuses and middle ears are compressed as we go deeper.
The pressure change happens very quickly in the first few metres. At around 10 metres of seawater, the volume of a flexible air space would be approximately half what it was on the surface.
That is why equalising is so important.
THE RULE: Equalize early and often!
Do not wait until your ears hurt.
If you feel pain, you have already waited too long.
Stop your descent, return to the surface if necessary, recover properly and try again.
Never force an equalisation because you desperately want to reach the bottom or get to a fish.
There are different equalising techniques.
Two of the most common are Valsalva and Frenzel.
Valsalva involves creating pressure from the lungs, while Frenzel uses the tongue and throat to move air into the spaces that need equalising.
For freediving, Frenzel is generally the better technique because it can be done more easily, more efficiently and at greater depth.
If you are struggling with equalisation, learn the correct technique before trying to dive deeper.
Barotrauma and Lung Squeeze
Equalisation is not the only pressure-related risk when we start diving deeper.
Another area divers need to understand is residual lung volume.
A simple way of thinking about residual volume is this:
Take a full breath.
Now imagine exhaling as much air as you possibly can until you feel completely empty.
There is still air left in your lungs. That remaining volume is approximately your residual volume.
When you dive deep enough, pressure compresses your full lungs towards this same volume.
For an average person this may happen somewhere around the 30-metre area, although everybody is different.
Diving near or beyond your normal residual volume increases the risk of lung squeeze.
Lung squeeze is a pressure-related injury to the lungs and surrounding tissue.
The risk can increase when a diver is cold, poorly adapted to the depth or makes sudden or aggressive movements at depth.
This is why depth should always be built up gradually.
Do not go from regularly diving 10 or 15 metres to suddenly trying 30 metres because somebody else is doing it.
Depth adaptation takes time.
Stay warm, relax at depth and avoid unnecessary stretching or violent movements when your lungs are heavily compressed.
Your body needs time to adapt.
Signs of Hypoxia
Before a full blackout happens, the body can sometimes give you warning signs that your oxygen level is getting too low.
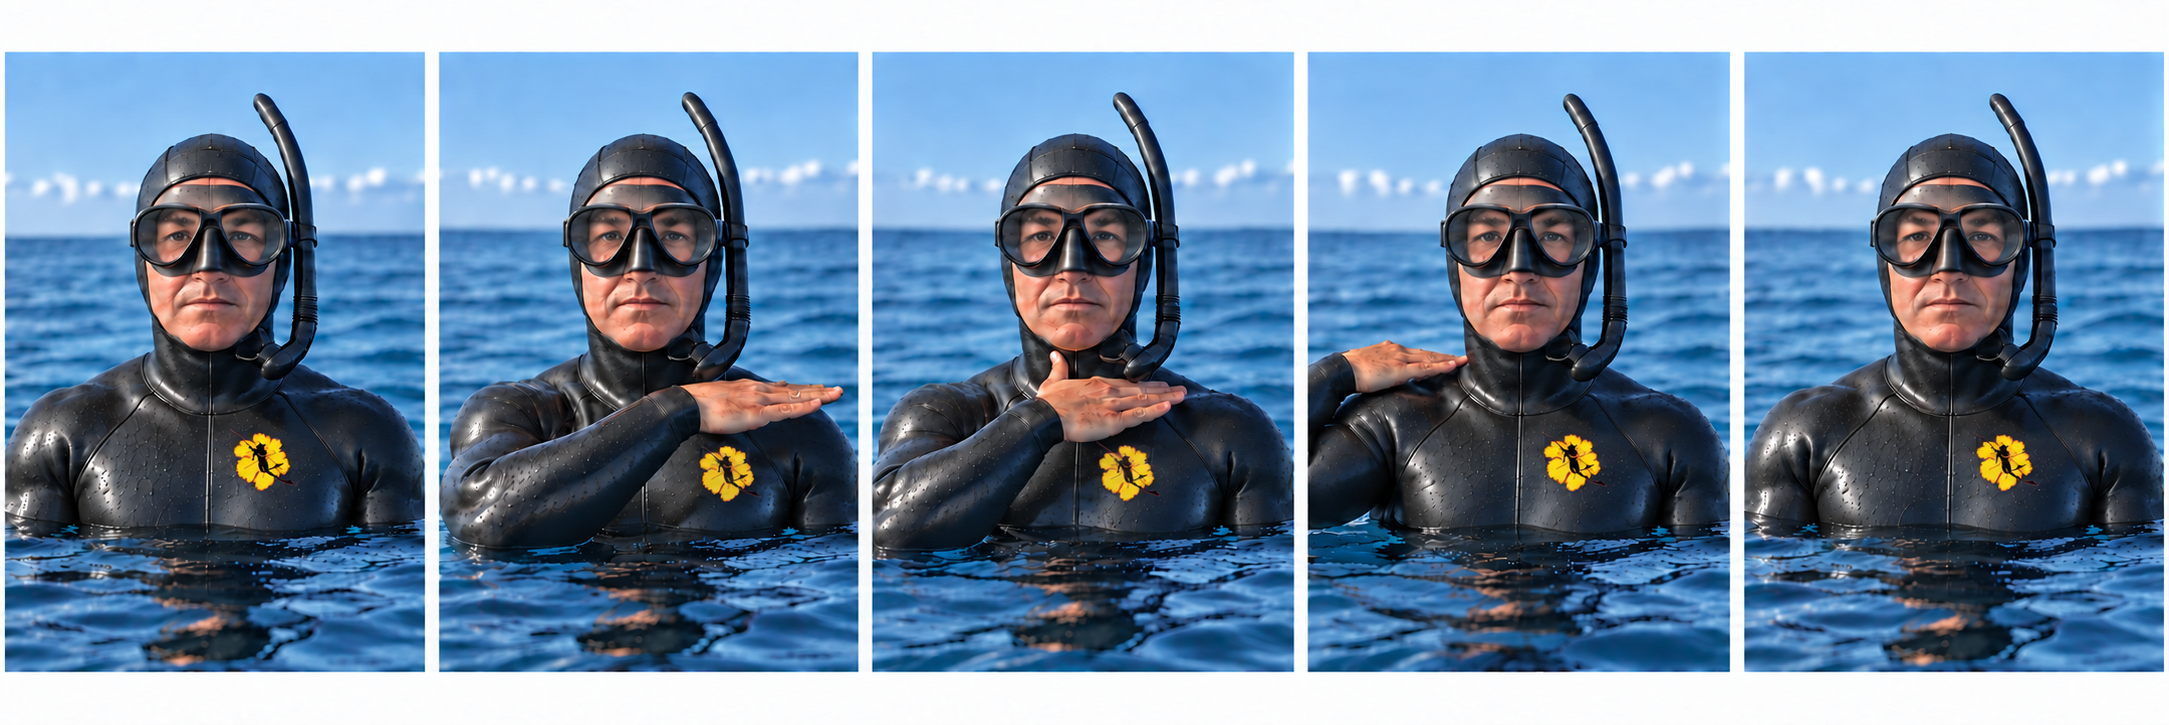
One of the more obvious signs is what freedivers call a Samba.
A Samba is when the diver starts losing proper control of his body. He may shake, twitch or have involuntary movements, even though he is still conscious.
Sometimes the signs are much more subtle.
His hands may start trembling.
His eyelids may twitch.
He may struggle with coordination.
He may suddenly look confused, disorientated or just not act normally.
A Samba normally happens at the surface after a dive or breath hold.
The important thing is that although the diver may still be conscious, he is already very low on oxygen and can still progress into a full blackout.
If you see any of these signs, take them seriously.
Make sure the diver does his recovery breathing, keep watching him closely and he needs to go sit on the boat to recover with normal breathing. Consider not allowing him to dive further that day..
Any sign of hypoxia means the dive has already been pushed too far.
If you feel any of these symptoms, remain relaxed and prepare to take recovery breaths first. Once at the surface with your airway clear of the water, do not speak — get your recovery breaths in first! Indicate to your buddy with your hand that you are having breathing problems.
Shallow Water Blackout
This is probably the subject every spearfisherman needs to understand properly.
A shallow water blackout can occur when a diver loses consciousness during the final part of an ascent or very shortly after reaching the surface.
One of the dangerous things about breath-hold diving is that you can feel reasonably comfortable at depth and still be much closer to your limit than you realise.
As you ascend, the surrounding pressure reduces rapidly.
The partial pressure of oxygen in the lungs also drops.
That means a diver who still has enough available oxygen to remain conscious at depth can suddenly become critically short of oxygen close to the surface.
This is why so many blackouts happen during the last part of the ascent.
It is also why pushing a dive to your absolute maximum is so dangerous.
You need reserve.
Always dive within your limits and keep something in reserve for the unexpected.
A fish gets tangled.
Your shooting line catches.
You battle to remove the spear.
You swim slightly further than expected.
There is current. Imagine you descend to 30m reading on your dive watch while a strong current carries you sideways. Relative to the seabed, your track becomes diagonal. If the current carries you 30m sideways during the descent, then in a simplified straight-line example the displacement relative to your starting point is:
√(30² + 30²) = 42.4m
So relative to your starting point on the seabed, your position has moved about 42m through space to reach a depth of 30m. That does not automatically mean that you physically swam 42m through the water because the current may be carrying you sideways. But once you are fighting the current, trying to hold position, hunting fish or dealing with a fish at depth, the workload and oxygen consumption can be very different. In really strong current, I would consider 30m + current + spearfishing activity a very different dive from a simple 30m vertical freedive.
Any one of these things can turn a normal dive into a much longer or harder dive.
Also remember your weight belt.
If you are in trouble, a weight belt is worth absolutely nothing compared with your life.
Drop it.
Your buddy should pay particular attention to the final part of your ascent and the first part of your surface recovery.
Watching somebody disappear below the surface and then looking away is not buddy diving.
Recovery Breaths
When you reach the surface, your dive is not necessarily finished.
A diver can still blackout after reaching the surface.
Your first breaths are important.
Hook breath or use a relaxed or passive exhale followed by a good, quick inhale.
Repeat this several times.
The idea is to get oxygen back into your system as quickly as possible without wasting time with a big forced exhale.
Your buddy should continue watching you after you surface.
Do not immediately turn away and start looking for the next fish.
Make eye contact.
Make sure your buddy is okay.
Then continue diving.
What to Do if Your Buddy Blacks Out
This is where having a properly trained buddy can save your life.
If a diver blacks out underwater and you can safely reach them, they need to be brought to the surface while protecting their airway as far as possible.
A commonly taught rescue technique involves supporting the back of the diver's head and neck with one hand while using the other hand to support the chin and help keep the mouth closed.
Keep the unconscious diver clear of your fins while swimming them towards the surface.
Once on the surface, the first priority is to keep the airway out of the water.
Remove the mask.
Support the diver properly.
If the hypoxic event happened underwater, give two rescue breaths as soon as you get to the surface.
AIDA freediving rescue training uses the sequence:
Blow. Tap. Talk.
Blow on the skin below the diver's eyes.
Tap the diver firmly on the cheeks, but do not slap them.
Talk firmly to them, use their name and tell them to breathe.
Repeat Blow, Tap, Talk for a maximum of about 10 to 15 seconds, or until normal breathing and consciousness return.
If the diver has not started breathing within about 15 seconds, give five rescue breaths, mouth-to-mouth, pinching the nose. Open the airway appropriately and call for help.. If normal breathing still does not return, get the diver out of the water as quickly and safely as possible, call emergency medical services, start CPR and continue with the drowning-resuscitation procedure you have been trained to use.
Any diver who has suffered a blackout stops diving for the day. No debate. Remember the diver may not even realise that he blacked out because it can feel like a blink or a moment of confusion. Seriously question a diver who has dropped his gun and does not know why.
After a blackout, rest and seriously consider medical advice, particularly after an underwater or prolonged blackout, if there was any possibility of water entering the lungs, or if there is persistent coughing, breathing difficulty, chest discomfort, confusion or anything else that does not feel right.
Practice the Rescue
Reading about a blackout rescue is not enough.
You need to practise it.
You need to know what it feels like to support another diver.
You need to know how to remove their mask.
You need to know how to control the airway.
And you need to know how to do all of this while you are tired and in the water.
Practise in a controlled environment with someone who knows what they are doing, whether through your club, an experienced diver or a freediving course.
Most importantly, make sure your regular dive buddy knows how to rescue you.
You could be the person saving his life one day.
He could be the person saving yours.
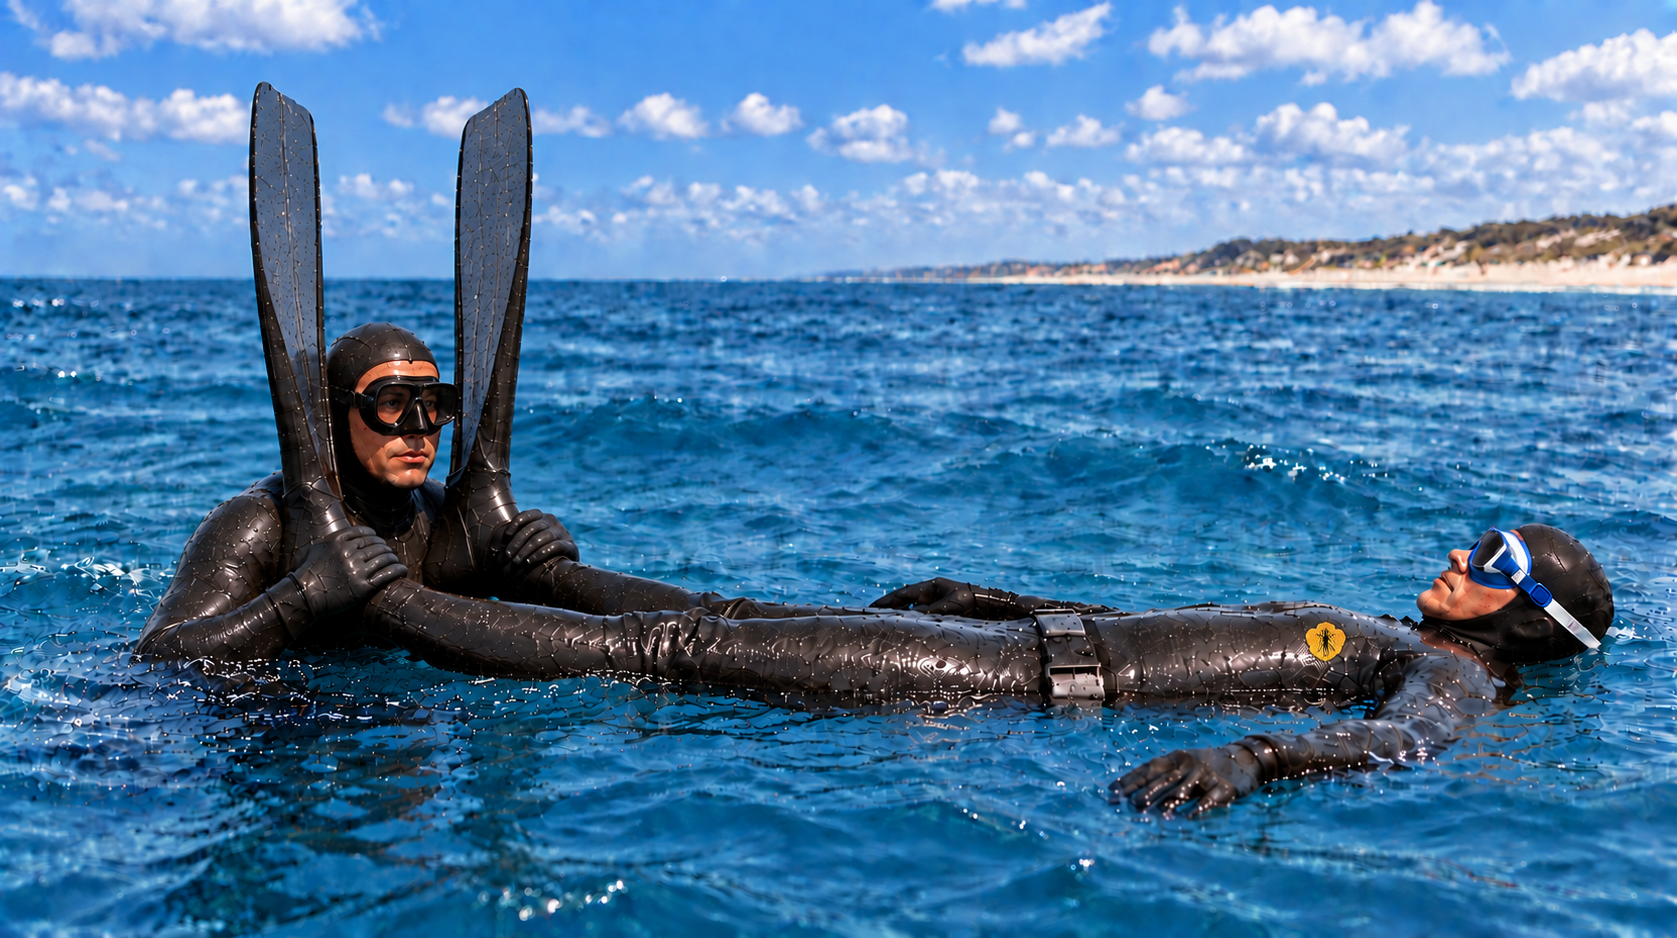
Tired Diver tow!
This technique helps an exhausted but fully conscious, cooperative diver reach shore or another safe exit. The tired diver lies on their back with their face clear of the water and their fins pointing upward. Position yourself at their feet, place their heels against your shoulders and hold their calves or lower legs. Swim forward, pushing the diver ahead of you, head first. Steer by gently pulling or pushing on their lower legs.
Choose a pace you can maintain till shore.
Diver caught in a rip current
If you are kicking toward shore but making no progress, do not exhaust yourself fighting against a rip current. Stay calm. Swim sideways across the flow — usually parallel to shore — until you are clear, then head toward shore at an angle, using incoming waves to help you. Be prepared to exit somewhere else instead of forcing your way back to your original entry point. Avoid swimming toward rocks or other hazards: plan the safest available exit. If you are a very strong swimmer and there is kelp you can hang onto the kelp and when a wave comes let go and let it push you forward and then hang onto the next piece of kelp and repeat I've done this underwater too but this technique is for experienced divers only who understand exactly what they are doing.
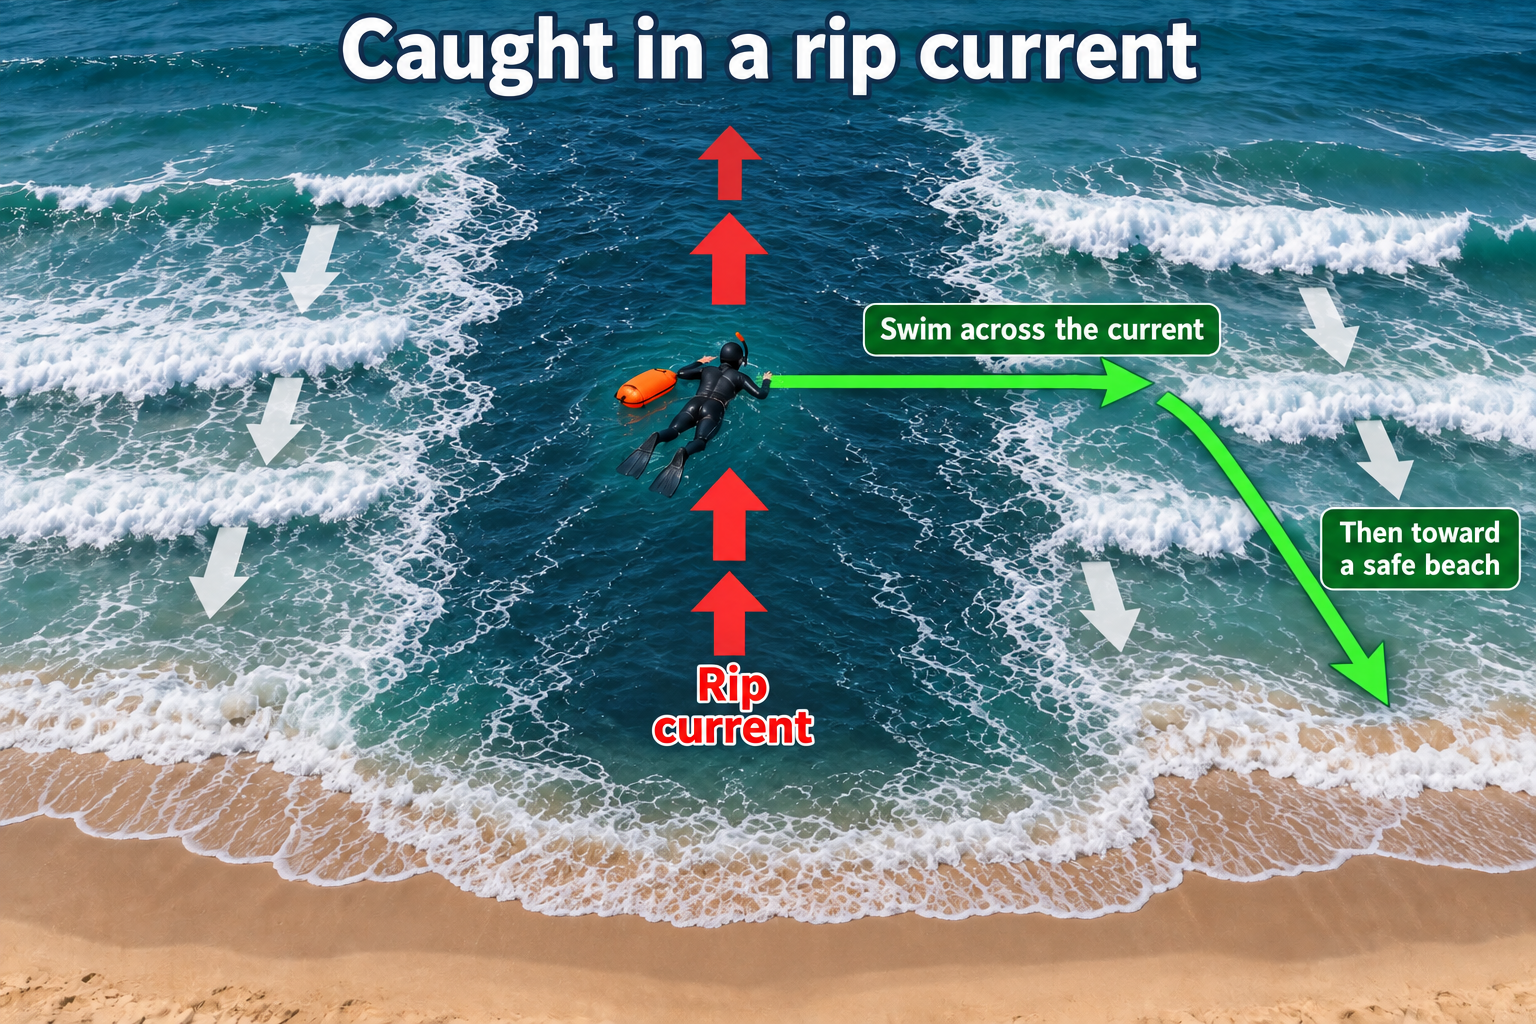
NSRI: understanding and escaping rip currents
Diver getting to shore in very large waves
Incoming waves can help carry you toward shore. Remain calm, conserve energy between waves while Body-surfing the waves towards a safe shore exit location. “I used a technique of body-surfing toward shore and resting between waves after our boat was swamped in huge waves while beach launching in Transkei.” — José de Nobrega This is a personal experience, and no guarantee that it will be best for you, every situation can be different, use your own discretion. Most important for me was to remain calm and let the sea help me to shore, swim and rest in-between waves.
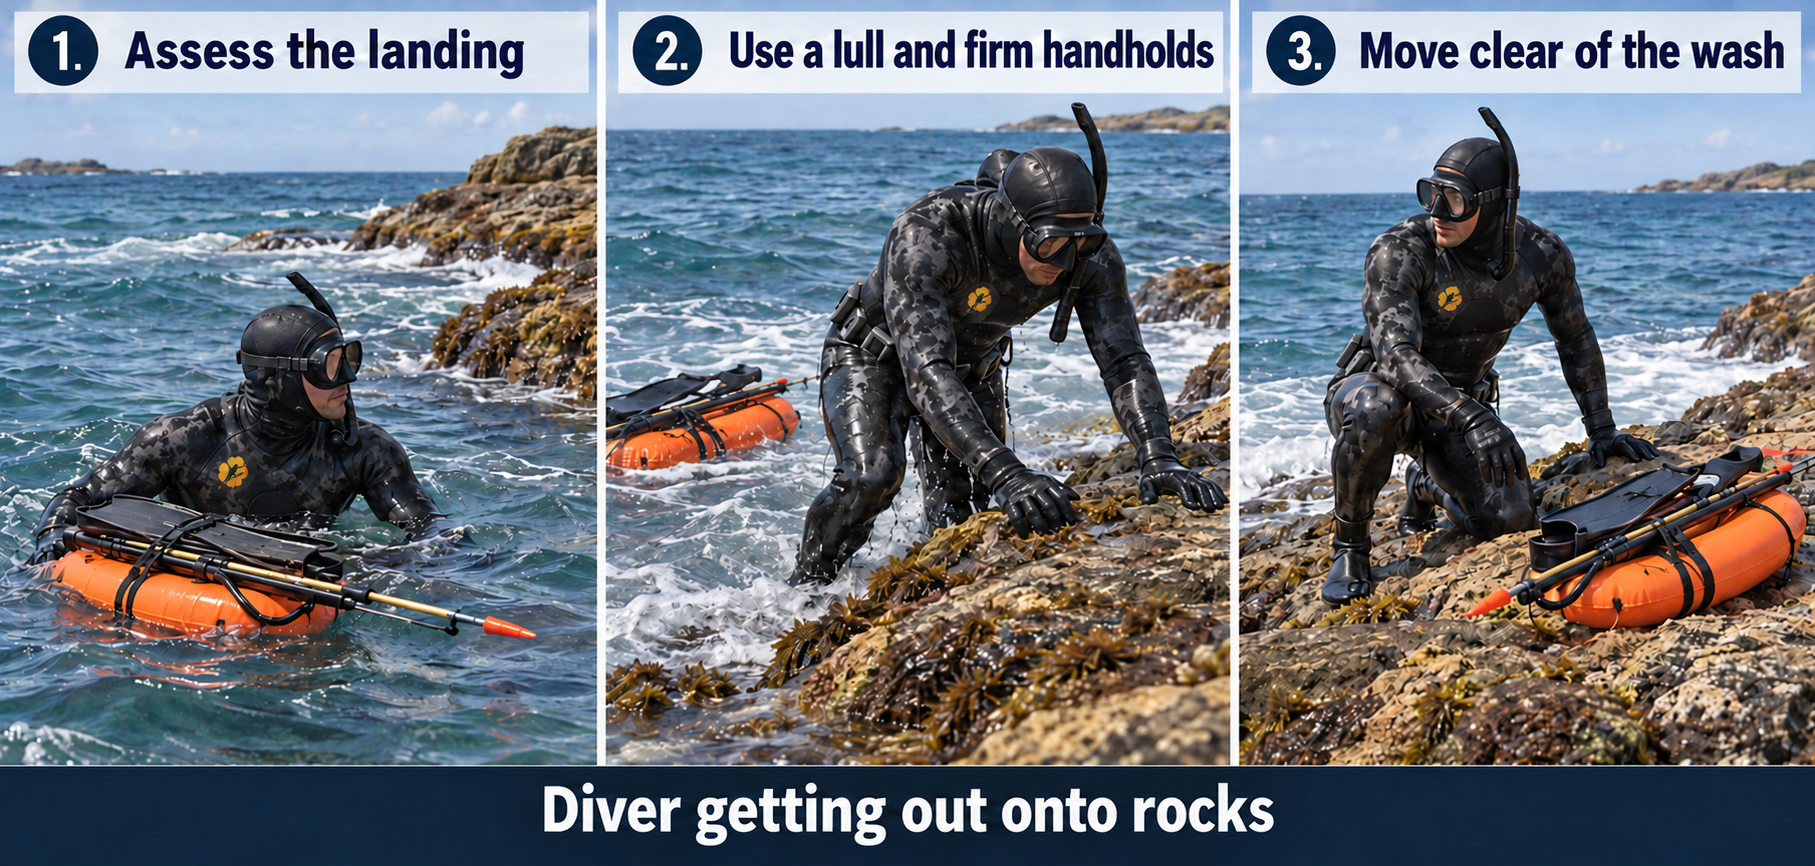
DAN: assess shore-entry and exit conditions
Diver getting out onto rocks
Choose the most sheltered landing with secure handholds and a clear route above the wash. Watch several waves and sets before approaching. Look for a lull. For a manageable landing, Time your landing so that you go ashore just behind the crest of a wave to avoid being thrown against the rocks. Quickly get a good handhold on the rocks so that you are not pulled back into the water as the wave pulls back. Hold on while the wave recedes. watch the sea, then scramble up the rocks as quickly as you can before the next wave reaches you.
Final Thought
Spearfishing will always involve risk. I have come very close numerous times and I was lucky, but one wrong mistake can easily be your last.
Do not panic. In any crisis, staying calm is the most important rule of all. Panic can turn a problem into a tragedy. Panic destroys judgment and paralyzes the muscles. The best cure, though, is an unshakable determination not to give way to it. Keep telling yourself that panic will only make things worse.
We swim out into the ocean, hold our breath and dive underwater while carrying equipment and hunting fish. We cannot remove every risk.
But we can manage those risks.
Use a dive float with a clearly visible dive flag.
Dive with a buddy.
Do not hyperventilate.
Give yourself proper surface recovery.
Use the correct weighting.
Equalise properly.
Build depth gradually.
Know your limits.
Never panic.
And never allow a fish, a competition, your ego or another diver to convince you to stay down for those few extra seconds.
There will always be another fish. There may not always be another breath.
Take Care, José de Nobrega, 2026.